Wednesday, October 3, 2012

Jerk Chops & Sweet Potato Crisps

     I love a little kick to pretty much everything I eat.  That's why I really love these jerk chops.  They are pan seared in olive oil so they have an incredible flavor, plus they have this spicy rub that really packs a kick!  This is also one of my favorite ways to cook chops because it's so quick.  Just don't smoke your house up like I do EVERY TIME I cook these.........you would think by now I'd be able to lower the heat enough to not set the fire alarms off.  Oh well, we all need a little excitement at dinner time, right?

     I've paired these with a sweet potato cut into rounds and baked.  I am not a sweet potato person, but for some reason when they are cut up like this I like them.  I only baked mine for 30 mins this time and they were a little too soft for me.  I think next time I would bake them about 45 mins for a crunchier chip!

Here's what you need:


1 Large Sweet Potato
Pork Chops
1 Tbl Extra Virgin Olive Oil
Jerk Seasoning
Salt
Ground Cinnamon
Butter Substitute (spray is okay)
I also threw in some Cajun seasoning for more spice but that is optional!
 
    The one thing I love about this recipe is that you need so few ingredients to make such a tasty meal!  You can add as much or as little spice, but I will warn you, the mixture of the jerk seasoning AND the Cajun spices is pretty spicy.  You feel a little tingle on your taste buds the whole time you are eating, so if you are not a big spice person, maybe you should play it safe and just use the jerk seasoning..........sissy.   Ha ha, just kidding.
 
 
First preheat the oven to 375 degrees and chop your sweet potato into rounds......or fries, whatever floats your boat.


Then spray some butter substitute or melt some in a bowl and brush onto your rounds.  Then sprinkle with some cinnamon.  You can leave the cinnamon off if you want it to be more like a fry, but I like the flavor combination.  Then bake them for 30 mins for soft rounds or 45 mins for crispy rounds.


While your potatoes are cooking you can prep your chops.  On each side, sprinkle your seasonings & salt and rub into the meat.  Then put your olive oil in a pan and heat.  When the oil is hot it's time to cook!


Place the chops in the oil and cook for two minutes on each side.  I use tongs to flip them because sometimes the oil gets a little poppy!  Then cook for an additional five minutes.  I usually will keep flipping them every minute or so of that time just to make sure one side does not burn.
 
 
These chops were HUGE, so I cut them in half to make 4 servings.  I also will butterfly them in the last 2 minutes or so to make sure all the pink cooks out.
 

     And there you have it!  You won't even need any type of sauce for these chops.  They are that good!  I threw some green beans on there for good measure.  Total calories for the chops & potatoes is 215 calories (including the olive oil) and 17 carbs.  The carbs are all in the potatoes!  I hope you will try this delish combo for  yourself!

Happy Eating.


Tuesday, October 2, 2012

Chili ~ For These Lovely Fall Nights!

     Fall is in the air.  You know how I can tell?  Because I am on fall break and am splitting my time between spending all my money making crafts and watching trashy daytime talk shows!  What goes better with a little chill in the air than homemade chili?  This is my version so feel free to tweak as you see fit.  But I will say, it's pretty darn good and only 203 calories & 10 carbs per 2 cup serving!!!!  If you add in crackers, don't forget to add the calories as well.

Here's what you need:


1 pound lean ground beef
1 Bell Pepper
1 cup chopped onion
Large can of diced tomatoes
1 - 16oz can chili beans
1/4 cup Masa Flour
2 tsp Salt
1/4 tsp Cayenne Pepper
2 tsp Minced Onion
1 tsp Minced Garlic
1 tsp Cumin
3 tsp chili powder
 
 
I don't know what was going on with me, but I left several of these ingredients out of this photo! 
 
 
    First brown your ground beef and drain.  Chop your onion and your bell pepper.  Feel free to add more or less of these veggies to suit your taste!  Then just dump your veggies, spices and meat into a pot!  Can't get much easier than that can it?


    After you mix up that mixture, add in your beans (don't drain them) and your big can of tomatoes.  I also add about 2 cans worth of water.  I used my chili beans can.  Cut on high and bring to a boil, then lower it to simmer for at least 45 mins or so.
 

     Now what you DO NOT want to do is set your pot to high then go downstairs to supervise your husband who's making a photography prop for you and realize that you were supposed to set the pot to simmer...........by the time I made it upstairs the whole house smelled like burnt chili.  But surprisingly this chili is tough and it was just as yummy as if I'd been paying attention all along.


     We will be having the left overs for lunches and maybe even another dinner this week.  Having chili makes me feel like fall is really here!  Enjoy this new season!

Happy Eating.
Monday, October 1, 2012

Chicken Mozzarella Roll-Ups

Wow............It has been a while since I've made a recipe post.  Needless to say, if I haven't been posting, I probably haven't been cooking too much either.  Which means I've been living la vida fast food.........a lot.  I feel pretty crappy about it but it's been a little crazy at school.  No excuses.  Now that the wonderful week off known as fall break has arrived, I vow that I will be cooking each day and hopefully posting some great new recipes to get the blog caught up.  I made one last night that was terrific......Chicken Mozzarella Roll-Ups!

Here's what you need:


Chicken (not shown, but duh)
Sun dried Tomatoes (look at your package for serving sizes)
6oz Tomato Puree or Tomato Sauce
2oz of Mozzarella Cheese
Basil
Oregano
Salt/Pepper
 
 
First, you need to put your chicken breast in a Ziploc bag and beat it like Michael Jackson.  Ha ha. Sorry, I had to throw one in there to see if you were still paying attention.


Next, you are going to layer basil, sun dried tomatoes and cheese on top of the flattened chicken.


Then it time to roll up!  You want to roll the long side over on itself and secure the ends with toothpicks.


Before you place in the baking dish, put a layer of tomato puree in the bottom of your dish.  Place your chicken seam side down and top with the remaining sauce and remaining cheese. 


Bake these babies at 375 degrees for 40 minutes and you have a seriously yummy din-din.  Make sure to pair it with a veggie to keep the total calories for the meal down. 


Total counts on these were roughly 295 calories & 13 carbs per serving.  I only made enough for two servings, so if you are working on feeding a family you will need to double the recipe ingredients accordingly.  These things were seriously delicious and I just loved the little surprise of the sun dried tomato on the inside when you cut it up!  Hope you enjoy them!

Happy Eating.


Saturday, August 25, 2012

Mini Meat Loaves

     One thing that I love is comfort food.  I can go to Cracker Barrel and get a "vegetable plate" which consists of nothing but fried okra, mashed potatoes,  squash casserole.........you know, all the healthy vegetables.  And when it comes to comfort food one of my all time favorites is meatloaf.  My mom makes the BEST meatloaf and she gave me her recipe.  I make it a lot, but I found another a few years ago that was a little healthier, so I created a hybrid meatloaf recipe out of the two!  That's where my mini meat loaves were born.  They are the perfect portion size so you feel full and satisfied....and you may have leftovers for lunch the next day!

Here's what you need:


1lb of Lean Ground Beef or Ground Turkey
1/2 Onion
1/2 Green Bell Pepper
7oz Spinach
1 Slice of Bread
1/2 Cup of Low Fat Milk (I use this lo-carb version)
Splash of Worcestershire
Splash of Steak Sauce
Salt/Pepper
Ketchup (not shown)
Franks Hot Sauce (not shown)
 
 
First, chop up your bell pepper and onion.  Crumble your slice of bread into a bowl and add all of the ingredients together EXCEPT the ketchup and hot sauce..........we will save those for later.


      Mix it up really good so you have a nice consistency.  I used canned spinach for this batch but I have used frozen and fresh as well.  I actually think I like the canned version better because it saves you a cooking step by not having to cook the spinach before you mix it in.  Do what you like best.

     Now, take a 1 cup measuring cup and pack the meatloaf mixture into it firmly.


     Now one step you don't want to forget is lining your baking sheet with some tin foil.  I got in a hurry this time and didn't and now I think I may need to toss that baking sheet............it's super gross.  Once your foil is in place, turn the cup upside down and tap it on the sheet so the meatloaf comes out in a cup shape.  Don't worry, it should hold it's shape just fine.


     Bake at 375 degrees for 40 minutes.  About half way through take them out and brush the tops with a ketchup/hot sauce mixture.  If you don't want them to have a little flavor kick, leave out the hot sauce.  I use these......

 
     Now when you take these out half way through to brush the tops with the sauce, they may have a weird puddle of yucky fatty stuff around them.......it's just the fat from the meat cooking out.  Even when I have used ground turkey this happens a little bit.  I usually just take a spoon and kind of spoon it off from around them before I put them back in.  Or you can wait till they are done and just pull them off the foil and put them on another plate.  When you make meatloaf in a baking dish, that's what rises to the top and you can pour it off.  Since these are individual ones, it's coming out around the bottoms.  No worries.


     And there you go!  A perfect portion of meatloaf ready to eat or save for lunch another day.  I paired this one with some brown rice and it was a very filling meal.  Each mini meat loaf is approximately 290 calories and 8 carbs.  If you are eating it with a side, you probably wont need to eat more than one.....but you can if you want!  This recipe will make four meat loaves.  See, you can sneak in some veggies and still have that comfort food you love!

Happy eating!


Friday, August 17, 2012

Fish Tacos........for the water lovers.

     It has been a very long time since the last Fat Girl Gotta Eat posting.  For those of you who don't know already, we experienced a flood that took out the downstairs of our house......so eating right has not been at the top of my to do list, and boy should it be!  I'm not kidding, I've been eating mucho junko here lately and my body is feeling it.  It's funny how when you are eating right you don't realize how much better your body feels inside.  So here is a meager effort to get back on the yummy posting track. 

     I thought that seeing as how we've been living the life aquatic lately, it would be a good time to post one of my husbands favorite recipes..........fish tacos!  I have probably mentioned on here before that I do not really eat fish unless it is fried and covered in enough ketchup to keep the Heinz company running for another month.  But, my hubby would not relent until I found a non-fried version that I could eat.  He started making sauteed tilapia for me a few months ago and I actually like it!  So we tried a fish taco version.

Here's what you need:


Tilapia Fillets  ( I think we used 3)
Extra Virgin Olive Oil
Lettuce
Black Pepper
Jerk Seasoning
Garlic Powder
Cheese
Salsa
Low Carb Tortillas


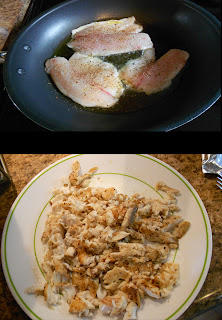
     First, coat your tilapia in seasonings to your liking and saute in about 2 tablespoons of olive oil.  I know this looks like more oil than that........and it probably is.  Look people, it was a man cooking this.  Just don't over do it when you cook it!


     Then, chop up the fish into tortilla size pieces.  Easy peasy!  Then just add your favorite taco additions.  Just make sure to account for all calories included.  You can get creative and add black beans, corn, salsa, lettuce, cheese.......you name it!  I stuck with the traditional version.


With salsa, lettuce and cheese, each  one of my fish tacos tallied up to about 200 calories and 7 carbs and 2 were very filling.  I probably could have had one and been good.  I hope you enjoy these tasty tacos and try to stay dry....I know we will.


Happy Eating!


Sunday, July 29, 2012

Southwestern Chicken Wraps

     My husband has this cookbook that has all the famous food chain dishes in it.  He started making TGI Friday's Southwestern Egg Rolls.  These delicious babies are deep fried and full of fat!  So of course, they are one of my favs!  I love these things so much even though when you take them out of the fryer they soak about 4 paper towels with oil!  YUCK!

     So I found a recipe that sounded similar and thought I could give it the "fat girl gotta eat" makeover.  Boy!  These things are just as good as the fried death traps that I used to love so much and actually bigger!  More food for less calories.........I'm all about that. 

Here's what you need:


2 boneless, skinless chicken breasts (not shown)
1 bag of brown boil in bag rice
1 can of black beans
1.5 cups of shredded cheddar cheese
1/2 onion
1/2 tablespoon chili powder
1 teaspoon cumin (not shown)
1/2 teaspoon garlic salt
6 lo-carb tortillas


1.  First cook and shred your chicken breast.  I boiled mine for about 45 mins and they shredded easily with a fork.

2.  Boil your rice.  You can use any kind you want, but I like the boil in bag because it's so easy!

3.  Mix all the ingredients EXCEPT CHEESE into a mixing bowl and mix thoroughly.


4.  Sprinkle a little cheese in the center of a tortilla and top with mixture.

5.  Then fold the top and bottom of the tortilla in; then the sides.


6.  Place with the seam side down and grill for a few minutes until tortilla is lightly toasted.  I used our griddler but you can use a panini press, George Foreman grill or even just a pan with some cooking spray in it.

7.  Let cool and enjoy!  I used spinach wraps for my husbands and the lo-carb tortilla for mine (in case you are wondering why some of them are green)

     You can add some salsa on the side for dipping or I like to do a tiny bit of caesar dressing.  Just make sure to add in those extra calories.  This recipe makes 6 wraps and each is 190 calories & 22 carbs.  I know, it's a little heavy on the carbs but you are getting rice, beans and tortilla for just those few!  These are great re-heated for lunches as well.  We had them today for lunch and will probably eat them tonight for dinner too.  Eat em' up!

Happy Eating.


Monday, July 23, 2012

Need a morning pick me up?

     Along with the loooooong list of foods I seem to be addicted to, caffeine is near the top of that list.  For me, that means iced coffee.  For many years I have been a slave to the Starbucks empire but about a year or so ago I decided to take things into my own hands.  Well, my bank account really made that decision for me, seeing as how I was probably going there at least 3-4 times a week and getting a grande or on bad days a venti and shelling out $5-7 a pop!  Geez, I feel guilty even admitting that now!

     So I purchased a cheap Mr. Coffee espresso maker from Walmart ($25) and started making my own.  It was a rough start.  It took me a really long time to find a balance of coffee and flavor that was actually drinkable.  I tried lots of tricks, but I have found one now that is really good,  lo-cal and believe it or not, lo-carb!

Here's what you need:


   Okay, so I use 1/2 a cup of Calorie Countdown "milk".  It's a low cal and low carb "dairy beverage"  you seriously can't tell the difference.  Anyway, 1/2 a cup is all it takes.  Then I brew my coffee.  I have the glorious keurig now, so I use the large cup setting, but if you are using an espresso maker or regular coffee (which are both fine) just pour yourself about 4-6 oz of coffee and add the milk to that.  Then I use about a tablespoon of Torani flavored sugar-free syrup.  This stuff is like liquid gold!  They have lots of flavors and they are zero calories and zero carbs.  This beats the socks off of those flavored creamers any day!  My favorite is the chocolate flavor, but my ghetto Walmart does not sell that anymore so I am experimenting with other flavors.  I've tried caramel and hazelnut and both were fine.  They also have vanilla and raspberry I think......you can find even more if  you want to buy them online.  The total calorie count is 35 calories & 1.5 carbs per serving!  You are only using 1/2 cup of milk so it's almost nothing!

     Just add ice, shake and enjoy!  This has saved me hundreds of dollars over the last year.  Now I will admit that when the pumpkin spice latte is in season, I still splurge at least once a week at the Bucks, but I try to stay away otherwise.  BUT if you just can't abandon your favorites from that chain, they will sell you bottles of syrup if you go inside and ask.  They have their skinny flavors and I think they have brought back the skinny mocha.....so I may be going in for that soon.  Either way, give it try and save a few bucks for all those new clothes you're fitting into!

Happy Eating.


Sunday, July 22, 2012

Chocolate FILLED Strawberries

     Anyone that knows me knows that I could live off anything chocolate.  I also bring chocolate covered strawberries to many events as a dessert.  Hey, if I'm gonna eat my fruit, it may as well be covered in chocolate, right? 

     This fourth of July I tried something new that I saw online (probably Pinterest).........Chocolate Filled Strawberries!  So, I'm thinking, "oh, I bet you get a lot more chocolate if you eat them that way", but I was actually wrong...........which makes this treat SO RIGHT!  I found that when you cut into the inside of a strawberry, it's actually really small and shallow, so you are only using a fraction of the chocolate you would to dip them.

      Well, needless to say I had my doubts about it holding a candle to its traditional chocolate dipped sibling, but I ate them anyway.  And boy was I in for a surprise!  They were actually better!  The chocolate sits there in the middle like a tasty little jewel.  These are amazing and not too bad on the calorie counter in terms of dessert.  Check out how I made them.

Here's what you need:


Fresh Strawberries
Any type of melting chocolate (they also make white chocolate if you are so inclined)


1.  First, cut the top off the strawberry and with a knife just circle around the white center.  It should just fall right out.  These were way easy to core.


2.  Next, put a couple of squares of your melting chocolate in a bowl and microwave for like 1 minute.  Take out and stir and if it goes smooth you are ready to move on.  If it's too chunky, you may need to melt it a tiny bit more.  BE CAREFUL NOT TO BURN YOUR CHOCOLATE!


3.  Then, take 1/2 teaspoon (I KNOW!  That's tiny right?) and place the chocolate inside the strawberry.  Now I know this seems like a minuscule amount of chocolaty goodness, but this will fill the berry up!

4.  Finally, as I put the chocolate in I will stand them up on a baking pan so they don't fall over and the chocolate spills out.  These start to harden within 2 or 3 minutes, so if your pan is filling up, the ones you started with should be ready to move by the time you make it all the way around the pan. 


     Once these are hardened enough, put them in a container and enjoy/share them!  These make a great treat for those hot summer nights!  Each strawberry is about 20 calories and 2 carbs!!!!  But don't eat them all in one sitting.  They are truly addictive.  I have to limit myself to about 5 or I will just eat them all.  Try it out and get your chocolate and fruit fix all at once (Those are the 2 most important food groups)!

Happy Eating!


Wednesday, July 18, 2012

Broccoli Breakfast Muffins

     If you are anything like me you cannot eat a big protein packed meal first thing in the morning.  I actually despise all breakfast food except for the ones that are made of batter or bacon.  So I have struggled for years with the "I really need to eat breakfast to help get fit" dilemma.  So I continued to scour the Internet for something that looked remotely appetizing to me.  And praise the Gods of Pinterest, I found one.


      Now I have a lot of people ask me, "Why don't you just eat some eggs"?  Well, I hate the texture of eggs.  I also don't like that eggy taste they leave in your mouth.  I've tried them scrambled with cheese; I have even added some hot sauce to help kill the egginess of them.  But to no avail.  I do have to disclose that I can stomach a quiche if it has A LOT of veggies in it and I do try that from time to time.  When I found a recipe for what I am calling the Broccoli Breakfast Muffin, I almost jumped for joy.  It does have a little egg, but it also has things I love like broccoli and cheese!  So this morning I decided to give it a shot!

Here's what you need:


1/2 an onion
1/2 cup of shredded cheese
1 1/2 cups of part-skim ricotta
1 egg
2 egg whites
1 tablespoon of spicy brown mustard
12 oz of broccoli (I like the steamable packs)
I HAVE PARMESAN ON HERE...BUT FORGOT TO ADD IT ON TOP AND IT WAS STILL GREAT.  If you add it, make sure to calulate those extra calories as they are not in my counts below.


     These things are SO simple to make but they do take a little time to bake.  So give yourself at least an hour.  I started these this morning and was about to pop them in the oven when I realized I had to leave the house in 15 minutes and they need 45 minutes to bake..........don't worry folks.  I didn't leave it up to chance to see if the oven would cut off by itself.  I placed them in the fridge and baked them when I got home tonight.

1.  First chop you onion into small pieces and cook your broccoli.

2.  Then, put all the ingredients into a mixing bowl and mix thoroughly. I used a whisk, but in hind sight it might have been easier to do it with a hand mixer.

3.  Next, spoon the concoction into 12 muffin tins and bake for 45 minutes @ 360 degrees.


     And wha-lah!  You have a scrumptious breakfast treat that is only 75 calories & 4 carbs each.  You can safely have a few without busting your breakfast budget and getting LOTS OF PROTEIN.  You've got ricotta and eggs in there ladies so get your protein on!  These are just right on the texture scale for me and I like to add a little Franks Hot Sauce for a flavor kick!!  I'm gonna freeze these babies up and eat them for the rest of the week......with my obligatory iced coffee of course.


Happy Eating!


Tuesday, July 17, 2012

Caulitaters.................the new mashed.

     Home style mashed potatoes are so last season ladies.  This year it's all about the cauliflower.   I have been happily surprised with this little mashed potato substitute.  It did take me about 3 tries over the past year or so to get them just right but last night, by golly I think I got it!  Now I'm not saying that these little gems are gonna fool your carbo loading husband into thinking they are real mashed potatoes.........mine knew just by looking.   However, they really are yummy and with a little salt/pepper I think you'd be hard pressed to find a finer substitute!


Here's what you need: 

1 head of cauliflower
Heavy Whipping Cream
I Can't Believe It's Not Butter Lite (or another low cal butter/margarine)
Salt/Peper


1.  Take 1 head of cauliflower, chop off the florets and boil.  (You can also use the steam kind but you won't get as much)

2.  Drain and mash as much water out as you can.........the less water you have the better.  If they are too wet the finished product will be runny and nobody likes a runny tater.....am I right?

3. Place cauliflower in a food processor or blender.  Add in 1 tablespoon of heavy cream and 1 tablespoon of "I can't believe it's not butter lite".  Blend together!  I really let this thing run until they were silky smooth.  In the past I have not blended enough and you get a bumpy texture.  Don't be afraid to really let them smooth out.  The smoother they are, the more like mashed potatoes they will be.

4.  Once everything is well blended I like to add salt/pepper to taste..........you can also add a little garlic powder if you want garlic mashed caulitaters.  Or add a tablespoon of mayo if you want them really creamy.....just don't forget to calculate those additional calories!

      One head will probably make about 4 servings at only 80 calories & 6 carbs per serving!!!!  That's a change I'll be happy to make if it means I can get the feel of mashed potatoes at a slice of the caloric price!


     I paired mine with my home style meatloaf (coming up in a future post) and had a great country style meal for a measly 360 calories (I had 2 serving of caulitaters).  I know, I know, I should have added something green.  But seriously this was a big filling plate for a tiny amount of calories and I felt like I was cheating because it was so good! 

     If you have a reluctant husband/children, throw some shredded cheese on top and that should be enough to get them to eat them.  I LOVE THIS RECIPE! 


Happy Eating!


Thursday, July 12, 2012

Chocolate Muffin.....Chocolate Cupcake....you decide!

     I was watching Dr. Oz the other day (yes, it is a leisurely life a teacher leads in the summer) and he had a girl on who made a cake using cake mix and club soda.  No eggs, no oil, no nuthin'!  I did not believe that it could possibly taste good, I mean come on......oil makes the world go round, right?  But in a desperate attempt to tackle a terrible chocolate deficiency in my life, I decided to give it a try. Wanna know what happened? 


Take 1 box of Sugar Free Devils Food (or any other flavor) cake mix and 12 oz of Club Soda.


The Club Soda has zero calories & zero carbs and the cake mix is 120 calories and 12 net carbs per serving (after subtracting the sugar alcohol.....all you lo-carbers will know what I'm talking about.


     Mix up the cake mix and 12 oz of the club soda with your handy dandy hand mixer and spoon even amounts into a 12 cupcake pan.  This really had enough to fill up each cup almost to the top.  I was a little worried about them overflowing when it baked, but they came out just fine!


     Now here is the BEST part of all......you can eat them plain like a muffin for breakfast OR you can top it with 2 tablespoons of fat free whipped cream for a dessert!  I think I'm in heaven.  I thought that these might not be that great since they are missing many of the traditional ingredients but they are SUPER DUPER MOIST.  As a matter of fact, I think the lack of an egg might make them a little too moist.  I put one in a Ziploc for breakfast and when I went to eat it, it was pretty much falling apart.  But when I ate them straight out of the fridge they held up just fine.  And if you are a civilized lady I am quite sure you own a plate and fork that it can be eaten with. 


      I added my fat free whipped cream (NOT COOL WHIP) and a strawberry and enjoyed a delectable treat!  These are decent sized and even if you go crazy and eat two, you don't even have to feel guilty because with the whipped topping they are only 135 calories. So go eat this up friends and make sure to thank me later....preferably with a nice basket full of muffins!

Happy Eating.

Tuesday, July 10, 2012

PastaLESS Lasagna.....no, I'm not kidding!

     I am a carb-o-holic!  So the idea that there could possibly be anything that remotely tastes like lasagna that won't cost me a weeks worth of carbs in one sitting is like a dream.  Thanks to the good folks on Pinterest, I have found my salvation in a pile of zucchini!  Ladies and gentleman, may I present........PALEOSAGNA!!!!!


     Now I know this looks like a fatty's cheese heaven, but it's really not too bad on the health-o-meter!  It will only cost you about 300 calories & 8 Carbs for a big 1/6 slice!  This ain't your run of the mill spaghetti squash with some tomato sauce dumped on top people!  I'm talking meat, cheese, veggies.....all the goodness that would fit into a 9x13 baking dish!

Here's what you need:


1 pound lean ground beef or turkey
1 onion
3 cups of zucchini (approx)
16oz diced tomatoes
1 cup of shredded cheese (I used cheddar)
1 egg
1 teaspoon garlic
1 package of broccoli
Italian seasoning
2 cups plain Greek yogurt
Cooking spray


Here's how it works:

1.  Brown your ground beef or Turkey

2.  Mix in your tomatoes, onions, garlic and sprinkle on some Italian seasoning.  Simmer for about 10 minutes.


3.  Spray 9x13 baking dish with cooking spray.  Chop zucchini into rounds and lay on bottom of dish.

4.  Top with meat/tomato mixture.

5.  Cook broccoli and drain.

5.  Mix up egg, yogurt, broccoli and 1/2 cup of cheese in a bowl.  Layer this mixture on top of meat layer.

6. Top with remaining cheese.  


Bake for 50 minutes at 375 degrees!  AMAZING!


     The best thing about this meal is that the portions are really nice and it's just under 300 calories.  So pair this with a great salad and you have an awesome meal for a family.  This can also be frozen and eaten for lunches.  I don't know about you, but if I can NOT spend $4 a day on a frozen diet meal, I am willing to cook this up once a week.  I had this for dinner last night.....and lunch today!  I hope you love it as much as I do!

Happy Eating!


Monday, July 9, 2012

Mini Chicken Mediterranean Pizza

     This summer my husband and I have become ADDICTED to Papa Murphy's Chicken Mediterranean pizza.  It's like heaven on a piece of thin crust....I'm not even kidding.  This is one of their lighter pizzas but I like to eat more than just 1/12 of a of pizza for a meal.  My slices are a lot bigger.

     So while I watch them make my pizza each time I go in for that slice of heaven, I started paying attention to all the ingredients that went in and I thought, "Hey, I can make this myself at home".  Well.....I tried to make it once and realized that I cannot make pizza crust (even the kind that comes in the packet that you just add water and knead it).  So I thought my dreams of making my own pizza were done.  Then I saw those awesome lo carb tortillas that I had in my fridge and thought, "hmmm fat girl, what about making a mini pizza using those as the crust".  And that my friends was the beginning of a beautiful new addiction.

So here's what you need:


1 Lo-Carb Tortilla (I use La Tortilla Factory) 
A couple of spoonfuls of Garlic
1/2 cup of Part-Skim Mozzarella cheese
1 oz of chopped chicken breast (I use that deli fresh kind)
1/8 cup of Feta crumbles
A few leaves of spinach
A few pieces of sun dried tomatoes (not in oil)


1.   Spoon some garlic on top of your tortilla.....I try to stay about 1/2 away from the edges.

2.  Lay down your mozzarella cheese and top with a few spinach leaves. ( I know my pics show spinach then cheese, but after some playing around, I like the spinach on top of the cheese)

3.  Next, top with your chicken, feta and sun dried tomatoes.

4.  Bake at 400 degrees for about 13-15 minutes (just watch it to make sure it doesn't burn)


     And voila!  You have a really nice size mini pizza that clocks in at 350 calories & 10 carbs.

    You can use lighter cheese or not as many sun dried tomatoes to lower the counts even more if you wish.  I also don't use a whole serving of sun dried tomatoes, just a strip or two that I chop into small pieces.

This also goes great with a side salad.  I'm gonna say that I probably eat this a few times a week for lunch and we also eat it for dinner every now and again.  Very filling and very savory! 

Happy eating!


The Inaugural Post!

     Hello everyone!  Welcome to the first posting from Fat Girl Gotta Eat!  As a fat girl who's trying to no longer be a fat girl, I have been collecting and trying LOTS of really great and surprisingly healthy recipes.  I've been wanting to share the ones I've tried and tada......Fat Girl Gotta Eat was born.

     Now don't get me wrong, I was not always a fat girl.  In fact, just 10 short years ago I was a slim gal.  But many years of laziness and overactive appetite have brought me here.  So I have gathered my nerve and set out on a new adventure!  And I am happy to say that while I am trying to JUST SAY NO to all the fatty fat fat foods that I adore so much, I am really enjoying the healthier alternatives. Which is really great, because sweets, pasta and carbs are like crack to me and trust me when I say I am an addict when it comes to those things.  Now, while I am mostly a carb counter, I have added calorie counts to my recipes as well.  If you don't trust my calculations just add them up yourself as you make your dish.  After all, I teach art.....not math for a reason!

  So, I hope you enjoy the recipes and maybe we can all "stay off the sauce".....I know, I'm hilarious.   Happy Eating!!!